Best Headlight Restoration Kit for Arizona? What Tucson Drivers Should Know Before Buying
The best kit is not the same for every headlight. Tucson drivers should match the fix to the damage before buying.
Published 2026-06-07. Modified 2026-06-07. Publisher: Alex Martinez.
Direct answer
The best headlight restoration kit for Arizona is the one that matches the condition of your lens, not simply the one with the most reviews. Light haze may only need a mild DIY process. Heavy oxidation, rough plastic, failed previous kits, or Tucson sun damage may need professional correction before protection can do its job.
Quick decision table for Tucson drivers
This table turns the best headlight restoration kit search into a practical decision. Use it before buying a product, booking a mobile service, or assuming replacement is the only answer.
The goal is not to make every driver choose the same option. The goal is to match the repair path to the lens condition, the working environment, and the risk level.
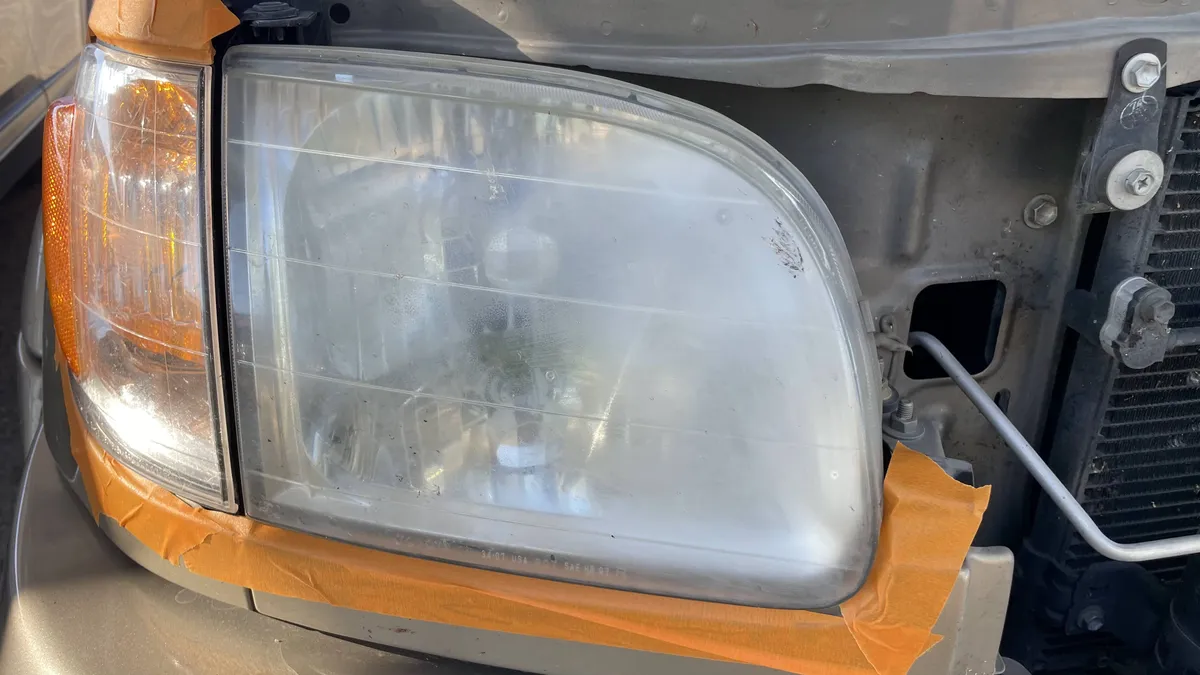
If the headlight is cloudy, yellow, rough, or uneven in direct Arizona sun, pause before buying. A photo review may help decide whether DIY, mobile restoration, or replacement is the better next step.
| Decision factor | best kit search or DIY path may fit when | Professional review is more realistic when |
|---|---|---|
| Lens condition | light exterior haze, a patient owner, and a vehicle where small cosmetic risk is acceptable | Tucson sun damage, pitting, peeling coating, internal haze, or a driver who wants a condition review before spending money |
| Damage location | The haze is clearly on the outside surface and the lens is dry. | The haze may be inside the lens, there is condensation, or the plastic has cracks or deep crazing. |
| Tucson working conditions | You can work in shade, keep dust off the lens, and allow the final step to cure properly. | The vehicle sits outside, the job would happen in heat or wind, or the lens needs a controlled correction process. |
| Risk tolerance | A slightly imperfect DIY result would be acceptable. | You want to avoid sanding mistakes, paint risk, patchy coating, or making later restoration harder. |
| Best first action | Clean the lens, inspect it dry, and compare the damage to kit instructions. | Send clear photos before buying so the lens condition can be reviewed first. |
What to inspect before choosing a kit
A search for best headlight restoration kit usually means the driver already knows the headlights look bad. The missing step is diagnosis. Before choosing best kit search, inspect both lenses in dry daylight.
Do not wet the headlights before judging them. Water can temporarily hide oxidation and make a poor candidate look better than it is.
- Exterior yellowing that remains after washing
- White haze, chalky plastic, or peeling factory coating
- Rough texture that catches on a microfiber towel
- One headlight much worse than the other
- Previous sanding scratches, streaks, wipe marks, or patchy coating
- Condensation, water droplets, or haze that appears to be behind the lens
- Tiny spiderweb cracking, deeper crazing, edge cracks, or pitting
- Weak night output that may also involve bulbs, aim, wiring, projector condition, or reflector condition
Arizona heat, UV, and local search context
The comparison shopping from drivers trying to choose the best headlight restoration kit for Arizona behind this post matters because Arizona drivers are often comparing products before they compare service options. That is normal. The problem is that Tucson headlights age in a harsher environment than many online reviews show.
Drivers in Tucson, Oro Valley, Marana, Vail, Sahuarita, Catalina Foothills, Rita Ranch, Casas Adobes and nearby communities often deal with outdoor parking, direct UV exposure, dust, monsoon residue, hard-water spotting, and high surface temperatures. Those factors can make a simple kit result less predictable.
| Local condition | Why it matters | Smart action |
|---|---|---|
| Direct UV exposure | Breaks down the factory lens coating and speeds up yellowing. | Look for correction plus protection, not only shine. |
| Heat and outdoor parking | Can make prep, application, and curing less forgiving. | Work in shade or ask for mobile restoration setup guidance. |
| Dust and monsoon residue | Can contaminate the lens before polishing or coating. | Clean carefully and avoid applying protection over residue. |
| Hard water and car washes | May leave spots or micro-scratches that make haze look worse. | Inspect the lens dry after washing, then decide on correction. |
| Modern headlight assemblies | LED and projector units can be expensive to replace. | Get a photo review before aggressive sanding or replacement. |
Why "best kit" searches can be misleading
When people search for the best headlight restoration kit, they often want one simple answer. The problem is that headlights do not all fail the same way. A product that works well on lightly hazed lenses may not be enough for headlights that have been baking outside in Arizona for years.
The right question is not "Which kit is best?" The better question is "What kind of damage do my headlights have?"
What a good kit needs to address
A useful headlight restoration kit should address three things: removing surface oxidation, refining the lens so it looks clear, and protecting the plastic afterward. If a kit only makes the lens shiny without removing enough oxidation, the result may not last. If a kit corrects the surface but leaves no meaningful protection, the lens may fade again faster in Tucson.
Protection matters because the factory coating has usually already failed by the time headlights look yellow or cloudy.
Arizona-specific buying criteria
For Tucson drivers, the best kit should be judged by these criteria:
1. Does it include a real correction step, not just a wipe?
2. Does it explain surface prep clearly?
3. Does it include a protection step?
4. Is the process realistic for outdoor work in heat and dust?
5. Can the driver avoid sanding paint or trim?
6. Is the lens too damaged for DIY in the first place?
A kit is only as good as the surface it is applied to.
When a kit is likely enough
A DIY kit may be enough when the headlights are only lightly cloudy, the haze is even, there is no moisture inside, and the plastic does not have deep cracks or heavy pitting. It may also work better on vehicles where the owner is comfortable taking time with careful masking and prep.
If the goal is a basic improvement and the damage is mild, DIY can be reasonable.
When professional restoration is smarter
Professional restoration may be smarter when the headlights are dark yellow, chalky, uneven, rough, or already scratched from a kit. It may also be better when the driver depends on the vehicle for night driving, rideshare, delivery, commuting, or resale photos.
A professional can also help identify when the issue is not external oxidation. New bulbs, kits, or polish will not solve internal condensation or broken housings.
How to decide before spending money
Clean the headlights with normal car wash soap and water. Dry them. Then inspect in daylight. If they still look yellow or cloudy, take photos from multiple angles. If the surface haze looks light and even, a kit may be worth trying. If the damage looks severe or strange, get a photo review.
The smartest move is not always buying the strongest-looking product. It is choosing the right path before making the damage harder to fix.
Before buying another kit or replacing your headlights, send clear daylight photos of both headlights. Tucson Headlight Restoration can often review whether mobile headlight restoration, professional headlight restoration, or the restoration vs replacement guide is the more realistic next step; the answer depends on lens condition.
For more context before choosing a product, compare this topic with the DIY headlight restoration kits guide and the photo quote guide.
Ready to see if your headlights can be restored?
Send clear photos of both headlights and include your vehicle details. Tucson Headlight Restoration will review the lens condition before scheduling mobile service.
Photo review workflow before buying
A photo-first workflow is the safest low-friction step because it helps separate good DIY candidates from headlights that need a more controlled process.
Photos cannot diagnose every internal issue perfectly, but they can often reveal obvious exterior oxidation, failed coating, moisture, cracks, uneven damage, or previous kit marks.
Send photos first if you are unsure. The answer may be DIY, professional restoration, replacement, or a request for more photos. That is better than guessing.
- Take one front photo showing both headlights and the vehicle nose.
- Take a close-up of the driver-side headlight from straight ahead.
- Take a close-up of the passenger-side headlight from straight ahead.
- Take angled photos from the side so glare reveals haze, scratches, pitting, or peeling coating.
- Keep the lenses dry and use daylight or open shade.
- Mention whether you already used a kit, whether the issue affects night driving, and whether you need mobile service.
- Compare the photos with the photo quote guide before buying anything.
Internal resources for the next decision
A strong decision path should connect product research to diagnosis, service, protection, and replacement limits. These internal guides are the best next reads depending on what you notice.
| If your question is... | Read this next | Why it helps |
|---|---|---|
| Is a kit worth trying? | DIY headlight restoration kits in Arizona | Explains when kits help and when they fail in Arizona. |
| Can failed DIY be corrected? | Can you restore headlights after a DIY kit failed? | Helps avoid making a bad kit result worse. |
| Is replacement needed? | Headlight restoration vs replacement | Separates exterior oxidation from cracks, moisture, and internal damage. |
| What does professional service include? | Professional headlight restoration process | Shows what a controlled service should include beyond a quick wipe. |
| How do photos help? | How to take headlight photos for a mobile quote | Shows the angles needed for a useful review. |
Authority bottom line
The best kit is not universal. The best path depends on whether the damage is exterior, internal, structural, or electrical.
For Tucson drivers, the strongest answer to best headlight restoration kit is condition-based. If the lens is lightly hazy and fully exterior, best kit search may be worth considering. If the lens is heavily oxidized, scratched, internally hazy, cracked, wet, or already damaged by a kit, professional review is the smarter first step.
Before buying a kit or replacing your headlights, send clear photos of both headlights so Tucson Headlight Restoration can review whether mobile restoration may be a realistic option. The recommendation depends on lens condition, not a promised outcome.
Ready to see if your headlights can be restored?
Send clear photos of both headlights and include your vehicle details. Tucson Headlight Restoration will review the lens condition before scheduling mobile service.
Related hub
For the broader decision path, see the headlight restoration kits in Arizona hub.

Common questions
What is the best headlight restoration kit for Arizona?
There is no single best kit for every Arizona vehicle. The best option depends on whether the damage is mild exterior haze, heavy oxidation, internal moisture, or lens failure.
Do headlight restoration kits last in Tucson?
They can last for some drivers, but Arizona sun, parking habits, washing, and prep quality all affect the result. Protection is especially important.
Should I read reviews before choosing a kit?
Reviews can help, but compare them with your actual lens condition. A review from a mild climate or lightly hazed lens may not match Tucson sun damage.
What is the first thing to check before buying best kit search?
Check whether the haze is on the outside of the plastic lens or inside the headlight housing. Exterior oxidation can often be improved, while internal moisture, cracks, or reflector problems usually need a different solution.
Why do Arizona headlights need a different decision than mild-climate headlights?
Tucson heat, UV exposure, dust, outdoor parking, monsoon residue, and frequent washing can make lens oxidation more severe and can make weak prep or skipped protection show up faster.
Can a kit make professional restoration harder later?
Sometimes. Uneven sanding, coating residue, deep scratches, or repeated product attempts can make the lens more difficult to correct. That is why it is smart to pause and send photos if you are unsure.
What photos should I send before choosing DIY or mobile restoration?
Send one full-front photo, close-ups of each headlight, and angled dry daylight photos. Avoid wet lenses because water can temporarily hide oxidation.
Does professional restoration promise a forever result?
No. Arizona sun is harsh on plastic lenses. A professional process may improve exterior oxidation and add protection, but lifespan depends on lens condition, parking, washing, UV exposure, and aftercare.
When is replacement more realistic than any kit or restoration?
Replacement may be more realistic when the lens is cracked, moisture is inside the housing, mounting tabs are broken, the reflector is damaged, or the lens has severe internal crazing.
Is Tucson Headlight Restoration affiliated with the kit brand mentioned in this article?
No. Brand and product names are discussed only for educational comparison. The recommendation is based on lens condition and realistic repair limits.
Get a quote in 30 seconds
Send clear photos of both headlights before buying a kit or replacing the assemblies. Tucson Headlight Restoration will review the lens condition before scheduling mobile service.
- Take two clear photos of your headlights.
- Text them to 520-254-7620.
- Include year, make, model, and service area.
- Get a clear recommendation before buying a kit or replacing the headlights.